Wow it's been a while, life just got silly, hopefully it will calm down a little now.
I have done virtually no quilting just a little quilt and pillow for my niece's doll's cot. It was for Christmas and as usual I did it at the last minute, then consequently forgot to take photos, oops!
Deciding that I had to do something creative I dug out a black work cushion I have been wanting to make for several years and am doing a little of that each day. Have put the camera batteries on charge so I can take a picture later.
Wednesday, December 30, 2009


Wednesday, September 2, 2009
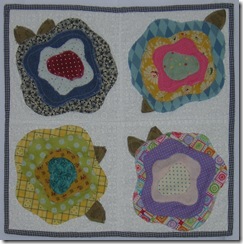
English Rose
Here is my finished piece for the Good Ol’ Summertime quilt swap.

It has been sitting in my wip pile for some time, I didn’t know what to do with it and was half thinking of making it into a cushion.
When I went through the ufo/wips last week it hit me it would be perfect for the swap, and I suddenly knew exactly how I wanted to finish it. Its amazing how quickly one can finish something when inspiration strikes.
It will be winging its way overseas early next week I hope my partner likes it.
Size: 16” square
Techniques: Patchwork, appliqué with satin stitch edging, quilting all done by machine.
Tuesday, September 1, 2009
Plum Jam
We’ve had a bumper crop of Victoria plums on the tree in the garden.


So I’ve been busy making yummy plum jam….
Recipe: Victoria Plum Jam
3lb plums
2 3/4lb sugar
knob of butter
Put the sugar in an oven proof dish and put in the oven on a low heat.
Halve and stone the plums. Put in a jam/large pan with approximately 1 pint of cold water. Bring to the boil then turn down the heat and simmer gently until the plums are cooked and squashy -approx 15 minutes.
Add the warmed sugar and stir to dissolve. Turn up the heat and boil rapidly for approx 10 minutes then test for set. When setting point is reached take off the heat and stir in the butter to disperse any scum. Ladle into warmed jam jars put on lids and leave to cool. Enjoy!
Monday, August 31, 2009
Good Ol’ Summertime Mini Quilt Swap
Bank Holidays are always a good time to play catch up, so I’ve been busy with my camera. I finally got around to taking pictures of the cute mini quilt I received, a few weeks ago from Kristine, for the ‘Good Ol’ Summertime’ Mini Quilt swap.
Kristine was hot off the starting block and had it made and mailed out to me before I had even begun to think about about what to make. She also sent me this cute pack of notelet cards.

Thanks Kris the quilt and the cards are great.
Tuesday, August 25, 2009
UFO’s or should that be WIP’s?
Today I have also been sorting through all my UFO’s (unfinished objects) or WIP’s (works in progress). I thought there were about six but horrifically there are 20, you can see them listed in the side bar. humm….

This is just one of them I blogged about it here last year when I started it! The attic windows play mat, the child I was making it for is now walking, so I guess she won’t be needing it!
So my challenge is to try to finish at least three of them before the end of the year. Or should I finish one before I am allowed to begin a new project, a tactic I have used successfully in the past. Maybe I should do both……. decisions decisions…..!!
Finally a Design Wall!
Today I finally made myself a design wall, using about 2 ½ metres of fabric in the process.
About a month ago (after some nagging from me) Tony, my lovely partner, put up hanging brackets and found a long length of wood to use as a baton for a design wall, all it needed was for me to add the fabric.
I took down the temporary design wall, part of an old bed sheet to which everything needed to be pinned. It was also rather narrow, being just about wide enough for a cot quilt!
Since then I have been procrastinating about making a new one, because I thought the flannel fabric, which had been hanging around my studio for at least a year, would need piecing. However, when it was unwrapped I discovered it was over 100" wide, and just needed cutting to size and a hanging sleeve added!
As the new one is made of flannel fabric, blocks and fabrics should cling to it without the need for pins, and as it is a much better size it should be able to take a double bed quilt.
Time taken to measure cut, sew and hang – approximately 30minutes.
Time taken to think/procrastinate about it - approximately 4 weeks........ho hum is there a lesson here?!!
About a month ago (after some nagging from me) Tony, my lovely partner, put up hanging brackets and found a long length of wood to use as a baton for a design wall, all it needed was for me to add the fabric.
I took down the temporary design wall, part of an old bed sheet to which everything needed to be pinned. It was also rather narrow, being just about wide enough for a cot quilt!
Since then I have been procrastinating about making a new one, because I thought the flannel fabric, which had been hanging around my studio for at least a year, would need piecing. However, when it was unwrapped I discovered it was over 100" wide, and just needed cutting to size and a hanging sleeve added!
As the new one is made of flannel fabric, blocks and fabrics should cling to it without the need for pins, and as it is a much better size it should be able to take a double bed quilt.
Time taken to measure cut, sew and hang – approximately 30minutes.
Time taken to think/procrastinate about it - approximately 4 weeks........ho hum is there a lesson here?!!
Thursday, August 13, 2009
Receipe for Fairy cakes
Oven temp: 190
2 x bun tins lined with paper cases
Makes 24
Ingredients:
6oz butter
6oz castor sugar
6oz SR flour
3 lrg eggs
Throw everything in the food processor and zap until all smooth and unlumpy
spoon into paper cases
bake in oven for 20 - 25 mins until risen and golden
When cool decorate with icing and sprinkles
Eat and enjoy
2 x bun tins lined with paper cases
Makes 24
Ingredients:
6oz butter
6oz castor sugar
6oz SR flour
3 lrg eggs
Throw everything in the food processor and zap until all smooth and unlumpy
spoon into paper cases
bake in oven for 20 - 25 mins until risen and golden
When cool decorate with icing and sprinkles
Eat and enjoy
Banana Cake Recipe
Oven temp: 170
7 inch cake tin, line base with waxed paper
Ingredients:
4oz butter
4oz castor sugar
6oz SR flour
1 lrg egg
2 ripe bananas
1 tsp bicarbonate of soda
2 tsps milk
Method:
Lightly mash the bananas
Dissolve the bicarb in the milk
Throw everything in the food processor, zap until everything is mixed all smooth and unlumpy
Pour into cake tin and bake in oven until risen and golden, approx 1 hour
When cool cover with icing and decorate with walnut halves (if liked!)
7 inch cake tin, line base with waxed paper
Ingredients:
4oz butter
4oz castor sugar
6oz SR flour
1 lrg egg
2 ripe bananas
1 tsp bicarbonate of soda
2 tsps milk
Method:
Lightly mash the bananas
Dissolve the bicarb in the milk
Throw everything in the food processor, zap until everything is mixed all smooth and unlumpy
Pour into cake tin and bake in oven until risen and golden, approx 1 hour
When cool cover with icing and decorate with walnut halves (if liked!)
Cooking up a storm
I've been Little Miss domesticity again!
 Banana Cake waiting to be iced, its supposed to be banana and walnut but we don't like wallnuts so I miss them out!
 Banana Cake waiting to be iced, its supposed to be banana and walnut but we don't like wallnuts so I miss them out!
Thursday, August 6, 2009
Spring Blooms Mini-Quilt Swap II
Look what arrived in the post 2 weeks ago.

Toni made and sent me this fabulous wall hanging, for the Spring Bloom mini quilt swap.
She also included this fantastic beaded keychain made by her as well.

Thanks Toni I love them both.
The quilt is hanging on my design wall at the moment; I just need to decide where its permanent home will be. My keys are hanging off the key chain and have been for two weeks now.
Thursday, June 25, 2009
Spring Blooms Mini-Quilt Swap
This is the quilt I made for the Spring Blooms Mini-Quilt Swap which I joined earlier in the year.
This picture does not do the quilt justice, the orange square in the middle of the flower does not show a dark colour behind it, there isn't a dark colour behind it. I couldn't get a really good picture of it and as time was running out I have to be satisfied with this!
The quilt is machine pieced and quilted from an adapted version of this pattern 'Ladybug Playground' from Seattle Bay Fabrics, scroll down the page it is at the bottom.
It measures about 12" x 20" I cannot remember the exact measurements, I didn't write them down...
It was touch and go whether it would get finished in time, but a little burning of the 'midnight oil' and it was finished packed and mailed on Monday afternoon. Monday being the deadline for posting. Phew! I hope the recipient will like it, I cannot put a link to her blog yet as it is a mystery swap, but as soon as she receives the quilt I will.
I haven't taken part in a quilt swap before so this was a little scary, isn't anything new?! But it was good fun, so.... flushed with my success I have just joined the In the Good Ol’ Summertime Mini Quilt Swap also organised by Michele. Details for joining here.
Sunday, June 21, 2009
Sunday - My Day!
On Sundays I try, whenever possible, to spend as much time as I can stitching or doing stitching related things. Today I decided to tackle the fabric waiting to be washed. Later, I will put up an embarrassing roll call, of just what I had stuffed it into 2 carrier bags.
Here's the coloured stuff, the white is already in the washer.

Now I have a confession to make..... after banging on about being frugal in an earlier post, last weekend I caved and bought more fabric! Obviously with very good reason!! :D
To cut a long story short, and having designed a quilt which I want to make in hand dyed silk. Back in April, the lovely Pat and Peter of Just Sew in Penrith gave me a bag of silk fabric to look through to decide if it was suitable. It was well past time I returned what I didn't want so I went to the shop! No point in wasting a journey, so I bought 8 metres of fabric for dyeing, I'd run out! I'd also run out of white on white fabric so I bought some of that too, 5 metres in fact! Oh yes and the 6.5 metres silk! eek!!
See, I need to stay out of fabric shops..... I've recently seen some fabulous fabrics on the web........
Tuesday, June 9, 2009
More Panda Fun
I have had very little time to sew this last week! But I have been sneaking to my machine in the odd 15 minutes I have managed to 'steal' and have been busy making the turnstile blocks for the Panda quilt. This is where I was at lunchtime today........

And finally this evening I have finished the turnstile border yee haa!
I have used a slightly different layout to AJ that's because I am using fabric from my stash, and didn't have enough of either the green or the turquoise fabrics! Now I just need to add the final borders and quilt it Yah!

Tuesday, June 2, 2009
Scrap and stash busting
I am in a very frugal mode at present, and am trying to use only fabric from my stash and/or scrap box.
This is partly because of the credit crunch, the wish to be greener, and also because I can barely move in my studio for the amount of fabric I have, this last is what I am convinced is stifling my creativity. My frugal self is objecting strongly to me buying yet more when I cannot accommodate or have yet to use what I already have, and is drowning out my creative spontaneous and spendthrift self.
So whilst Ms Frugal reigns supreme I am working with what I already have. When I ran out of cream fabric this afternoon (see earlier post) Ms Spendthrift was all for running off the the local fabric shop to buy more, and to be honest at one time that is exactly what I would have done. But Ms Frugal said 'No, lets have a look and see if there is something else we can use', and sure enough I found a different but similar fabric to complete my project. So I saved some money, now lets be honest here too, a lot of money was saved coz once inside the fabric shop it would have been more that the 'needed' amount that would have been bought!! I also saved on a car journey helping to keep my carbon footprint down too!
This is partly because of the credit crunch, the wish to be greener, and also because I can barely move in my studio for the amount of fabric I have, this last is what I am convinced is stifling my creativity. My frugal self is objecting strongly to me buying yet more when I cannot accommodate or have yet to use what I already have, and is drowning out my creative spontaneous and spendthrift self.
So whilst Ms Frugal reigns supreme I am working with what I already have. When I ran out of cream fabric this afternoon (see earlier post) Ms Spendthrift was all for running off the the local fabric shop to buy more, and to be honest at one time that is exactly what I would have done. But Ms Frugal said 'No, lets have a look and see if there is something else we can use', and sure enough I found a different but similar fabric to complete my project. So I saved some money, now lets be honest here too, a lot of money was saved coz once inside the fabric shop it would have been more that the 'needed' amount that would have been bought!! I also saved on a car journey helping to keep my carbon footprint down too!
The fight with the Panda continues!
Week 5 (in my case day 2) Turnstile Borders
The saga of cutting out pieces the wrong size continues! Last night I foolishly decided to cut out the fabric for the turnstile border, even though I was tired.
Consequently I cut the first set of cream/white triangles too big and have to trim them all, cut out only half the required number of the second set of cream/white triangles, and have now run out of that fabric. A bit of jiggery pokery was called for and fortunately I found I have a very similar fabric which I am adding.
On a more positive note I have successfully sewn 5 of the turnstile blocks here are two of them!

And here's pic of week 4 adding the top and bottom border, this was one area I managed to do successfully without any foul ups!

Monday, June 1, 2009

Sunday, May 31, 2009
Panda quilt along - head and body together

He still needs his back legs and his ears finishing off, will do that tomorrow, its now time for bed!
Panda quilt along - progress
Happily everything went much better after supper. I managed to cut the pieces out without mishap, so he now has a body!

Panda quilt along
I saw a really cute Panda quilt along on AJ's Blog and have been tempted to join in... Thought it would be fun to spend the afternoon playing catchup..... I'm only 5 weeks behind!
Have learnt that I can't follow clear precise instructions even if they come with very good diagrams/pictures?!
I cut out the face, cutting several pieces the wrong size in the process!
When I began to piece it and realised I had no back ground fabric, and was consequently 2 pieces short. The only fabric I liked and had enough of needed washing.
(Note to self wash all the fabric recently bought... eeek there's yards of it!)
Then the picture went horribly wrong, I managed to lose the ears in the background, had to place it on a white background so you could see it.
Not sure this panda likes me :0)

Have learnt that I can't follow clear precise instructions even if they come with very good diagrams/pictures?!
I cut out the face, cutting several pieces the wrong size in the process!
When I began to piece it and realised I had no back ground fabric, and was consequently 2 pieces short. The only fabric I liked and had enough of needed washing.
(Note to self wash all the fabric recently bought... eeek there's yards of it!)
Then the picture went horribly wrong, I managed to lose the ears in the background, had to place it on a white background so you could see it.
Not sure this panda likes me :0)
However, here's my progress so far.
Will now have a break, go make some supper, then back to the attack this evening perhaps.....?
Thursday, May 28, 2009
Little Gem/Twilt
Why as someone who doesn't 'do' flowers am I drawn to flowers of late?
 Size: A4 (approx 11 3/4" x 8 1/4")
Techniques: piecing, machine quilting with a multi-coloured thread
Fabrics: all from my scrap box so perhaps that's not stash busting, the greens are hand dyed the rest commercial prints.
Subscribe to:
Posts (Atom)


